Explanation
To determine if media is in use on a specific website, you can use the Sitecore PowerShell Get-ItemReferrer method to retrieve all referrers and check if any point to the specific website. To verify if a page is live and using the component, you can check the publish restriction and workflow status of the page. Alternatively, you can simplify the process by checking the web database for only published items, if you're using the Sitecore Experience Platform with a web database.
To find out if a page is part of the website, you can check the item's path and whether it has a layout, indicating it is a page. A reference can also lead to a component, and you can then determine if the component has a reference to a page in the website. When programming these extensive checks, you may encounter exceptions. For example, an image gallery may have children with no references, but they work based on the assumption that they are children of a gallery component.
you can program exceptions for specific templates to handle that. See the code provided as an example, you'll need to manage your own specific exceptions or perform a less extensive check, depending on your solution.
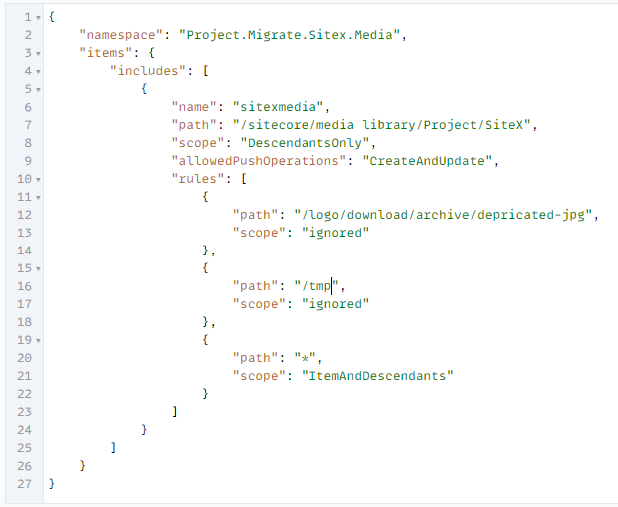
Serialize with Sitecore CLI and deserialize in XM Cloud
First, add the necessary rules to your serialization file, then serialize the content to your local disk. Next, connect your Sitecore CLI to XM Cloud and push the content directly to Sitecore. This straightforward process can save you time and effort, but keep in mind the importance of using the correct version of the CLI. If your Sitecore instance requires an older CLI version, be sure to switch accordingly. Additionally, utilizing a named connection with the "--environment-name" parameter can help you avoid potential mistakes.
Example:
# connect to the Source Sitecore and use a specific version of the CLI
dotnet sitecore login --client-id Device --authority https://id-mysitecoresource/ --cm https://cm- mysitecoresource --allow-write true
dotnet nuget add source -n Sitecore https://nuget.sitecore.com/resources/v3/index.json
dotnet sitecore plugin remove -n Sitecore.DevEx.Extensibility.Database
dotnet tool uninstall Sitecore.CLI
dotnet tool install Sitecore.CLI
--version 4.2.1
dotnet sitecore plugin init --version 4.1.0 --overwrite
#to disk
dotnet sitecore ser pull
#use the latest CLI and connect to XM Cloud using environment-name xmcloud-prd
dotnet tool uninstall Sitecore.CLI
dotnet tool install Sitecore.CLI
dotnet sitecore plugin init --overwrite
dotnet sitecore login --authority https://auth.sitecorecloud.io --cm https://xmc-mysitecorecloud.sitecorecloud.io/ --audience https://api.sitecorecloud.io --client-id Hityhisismyclientid05FillInyours1 --environment-name xmcloud-prd --allow-write true
#to Sitecore XM Cloud
dotnet sitecore ser push --environment-name xmcloud-prd
Media Folder location
When using item serialization to migrate items, the source and destination paths are the same. If the destination path needs to be different, simply move the media items after the import process. To automate the movement of multiple folders, consider using the SitecoreCommander tool available on GitHub.
Post action: Max 100 children recommendation.
Sitecore recommends limiting the number of items under any given node to 100 or less, as this helps maintain performance and usability. You can easily identify folders with excessive items by running the "Limit the number of items under any given node" PowerShell report, which is available under the Solution Audit. See Tip: Find and Optimize Nodes with Over 100 Child Items in Sitecore. If you have folders with a large number of items that require optimization, the SitecoreCommander tool provides automation functionality to address this.
Stay tuned for Part 3 of this series, where we’ll explore the use of the Sitecore Authoring and Management GraphQL API. Each part will build upon the knowledge shared here, guiding you through a seamless transition to Sitecore XM Cloud. If you have any questions regarding this blog, please feel free to get in touch with me!