Sitecore content migration - Part 1: Media analysis
Welcome to this new blog series! The coming three parts will be focused on automating content migration from Sitecore XP to Sitecore XM Cloud for developers. We’ll cover the analysis phase and the actual migration of media and content items. This series follows up on the blog "Migrating Your Content Seamlessly: A Comprehensive Tech Guide from WordPress to Sitecore XM Cloud", which covered the migration of simple content. In this new series, we’ll dive deeper into more complex content migrations, particularly focusing on migrating SXA MVC websites to the headless XM Cloud.
We’ll also reference another blog, "Seamless Content Migration with GraphQL," which discusses the Sitecore Authoring and Management GraphQL API. In Part 3 of this series, we’ll explore how to use this API for scenarios where the XM to XM Cloud Migration Tool falls short.
Preparing for media migration
Before migrating media from Sitecore XP to Sitecore XM Cloud, it’s important to perform a quick analysis. This analysis will help you identify media files that exceed the 50MB size limit imposed by XM Cloud Edge and provide you with information about the number of files and the total storage size in gigabytes. Depending on your migration method, it may also be necessary to sanitize the media. For example, Sitecore item serialization does not work with multiple items that have the same name in XM Cloud.
How to migrate media
Migrating media from Sitecore XP to the Sitecore XM Cloud media library presents an opportunity to clean up your media assets. It’s highly beneficial to script the migration process, allowing you to include or exclude media based on specific rules, rather than selecting files manually or copying everything—including outdated files that haven’t been used for years. Additionally, it’s advantageous if the GUID (Globally Unique Identifier) remains unchanged during the migration, as this simplifies content migration. The media template remains consistent in XM Cloud.
Here are some migration options:
- XM to XM Cloud Migration Tool: This tool does not support containers or scripting, requiring manual selection of media.
- Sitecore Item Serialization with CLI: A fast, config file-based option with rule customization. You can generate these rules using Sitecore PowerShell (more on this in Part 2 of this series).
- Sitecore Authoring and Management GraphQL API: This option does not retain the original GUID, as it will be changed during the migration.
- Packaging: Suitable for smaller amounts of media but does not work well for large volumes, requiring the media to be split into smaller packages.
Among these, Sitecore Item Serialization with CLI is often a strong choice.
Identifying large media items
An easy way to identify large media items is by using the PowerShell report "Media by Size and Type," found under Media Audit. Simply run the report and sort the results by size. Keep in mind that while Sitecore Edge enforces a maximum media item size of 50MB, Sitecore XP itself does not have this limitation.
Determining file types and quantities
You can use the Sitecore Search functionality within your media library to determine the number and types of files present. For example, during a recent migration, I discovered many “Node” templates where the “Media Folder” templates would have been a better fit due to their default media insertion options and greater consistency. Is your goal a quick lift-and-shift, or are you migrating to XM Cloud with the intention of making improvements?
Calculating stored size
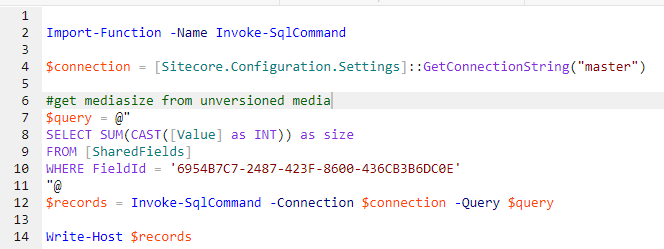
If you need an estimate of the total storage size, you can sum the "Size" field using a PowerShell script similar to the "Media by Size and Type" report. Alternatively, you can execute a SQL query to achieve the same result. Note that you can run SQL queries directly within Sitecore PowerShell. See how-can-i-determine-how-many-bytes-of-images-we-have-in-the-sitecore-media-library.

Handling duplicate item names
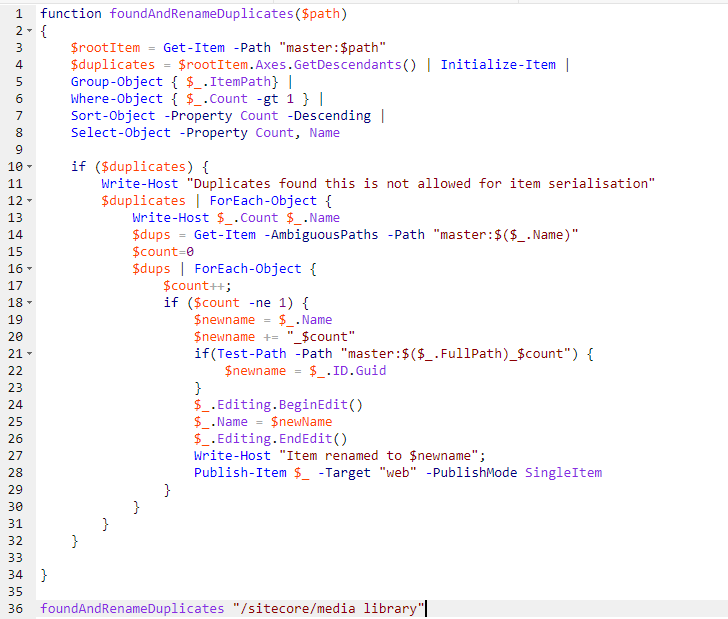
In older versions of Sitecore, it was possible to create multiple items with the same path. While this is more difficult to do today, it’s important to rename any duplicate items before migration. You can find duplicates using the PowerShell report "Items with Duplicate Names" under Content Audit. If you have many duplicates, you can automate the renaming process using PowerShell.

Laying the groundwork for seamless content migration: what’s next?
Thank you for taking the time to read through the first part of our series on Sitecore Content Migration. I hope it was helpful to discover more about the critical steps of analyzing and preparing media for migration from Sitecore XP to Sitecore XM Cloud. The insights and strategies shared here will help streamline your migration process and set a solid foundation for the next phases.
Stay tuned for Part 2, where we’ll cover content item migration, and Part 3, where we’ll explore the use of the Sitecore Authoring and Management GraphQL API. Each part will build upon the knowledge shared here, guiding you through a seamless transition to Sitecore XM Cloud. If you have any questions regarding this blog, please feel free to get in touch with me!


